Camera with image recognition
Interface
The following functions (left to right, top to bottom) are available in the camera with image recognition of the SKU's on the shelves:
On the camera window:
![]() A mini-map of the progress of photography and the way in which it was taken
A mini-map of the progress of photography and the way in which it was taken
First row of badges:
 Tilt sensor
 Flash
Flash Flashlight
 Switching the camera to front or main camera
 Grid
Grid Cropping photo
Second row of badges:
 Exiting the chamber
 View photos taken
 Take a picture
 Displaying and selecting the current direction of travel when taking a photo
 Complete the shoot by attaching all photos to the report
Employee's movement during shooting scenes
EasyMerch merges all photos taken within a single sales location into a Scene
For a scene to merge correctly, you must shoot in one of two ways: Left to Right (rows) or Top to Bottom (columns)
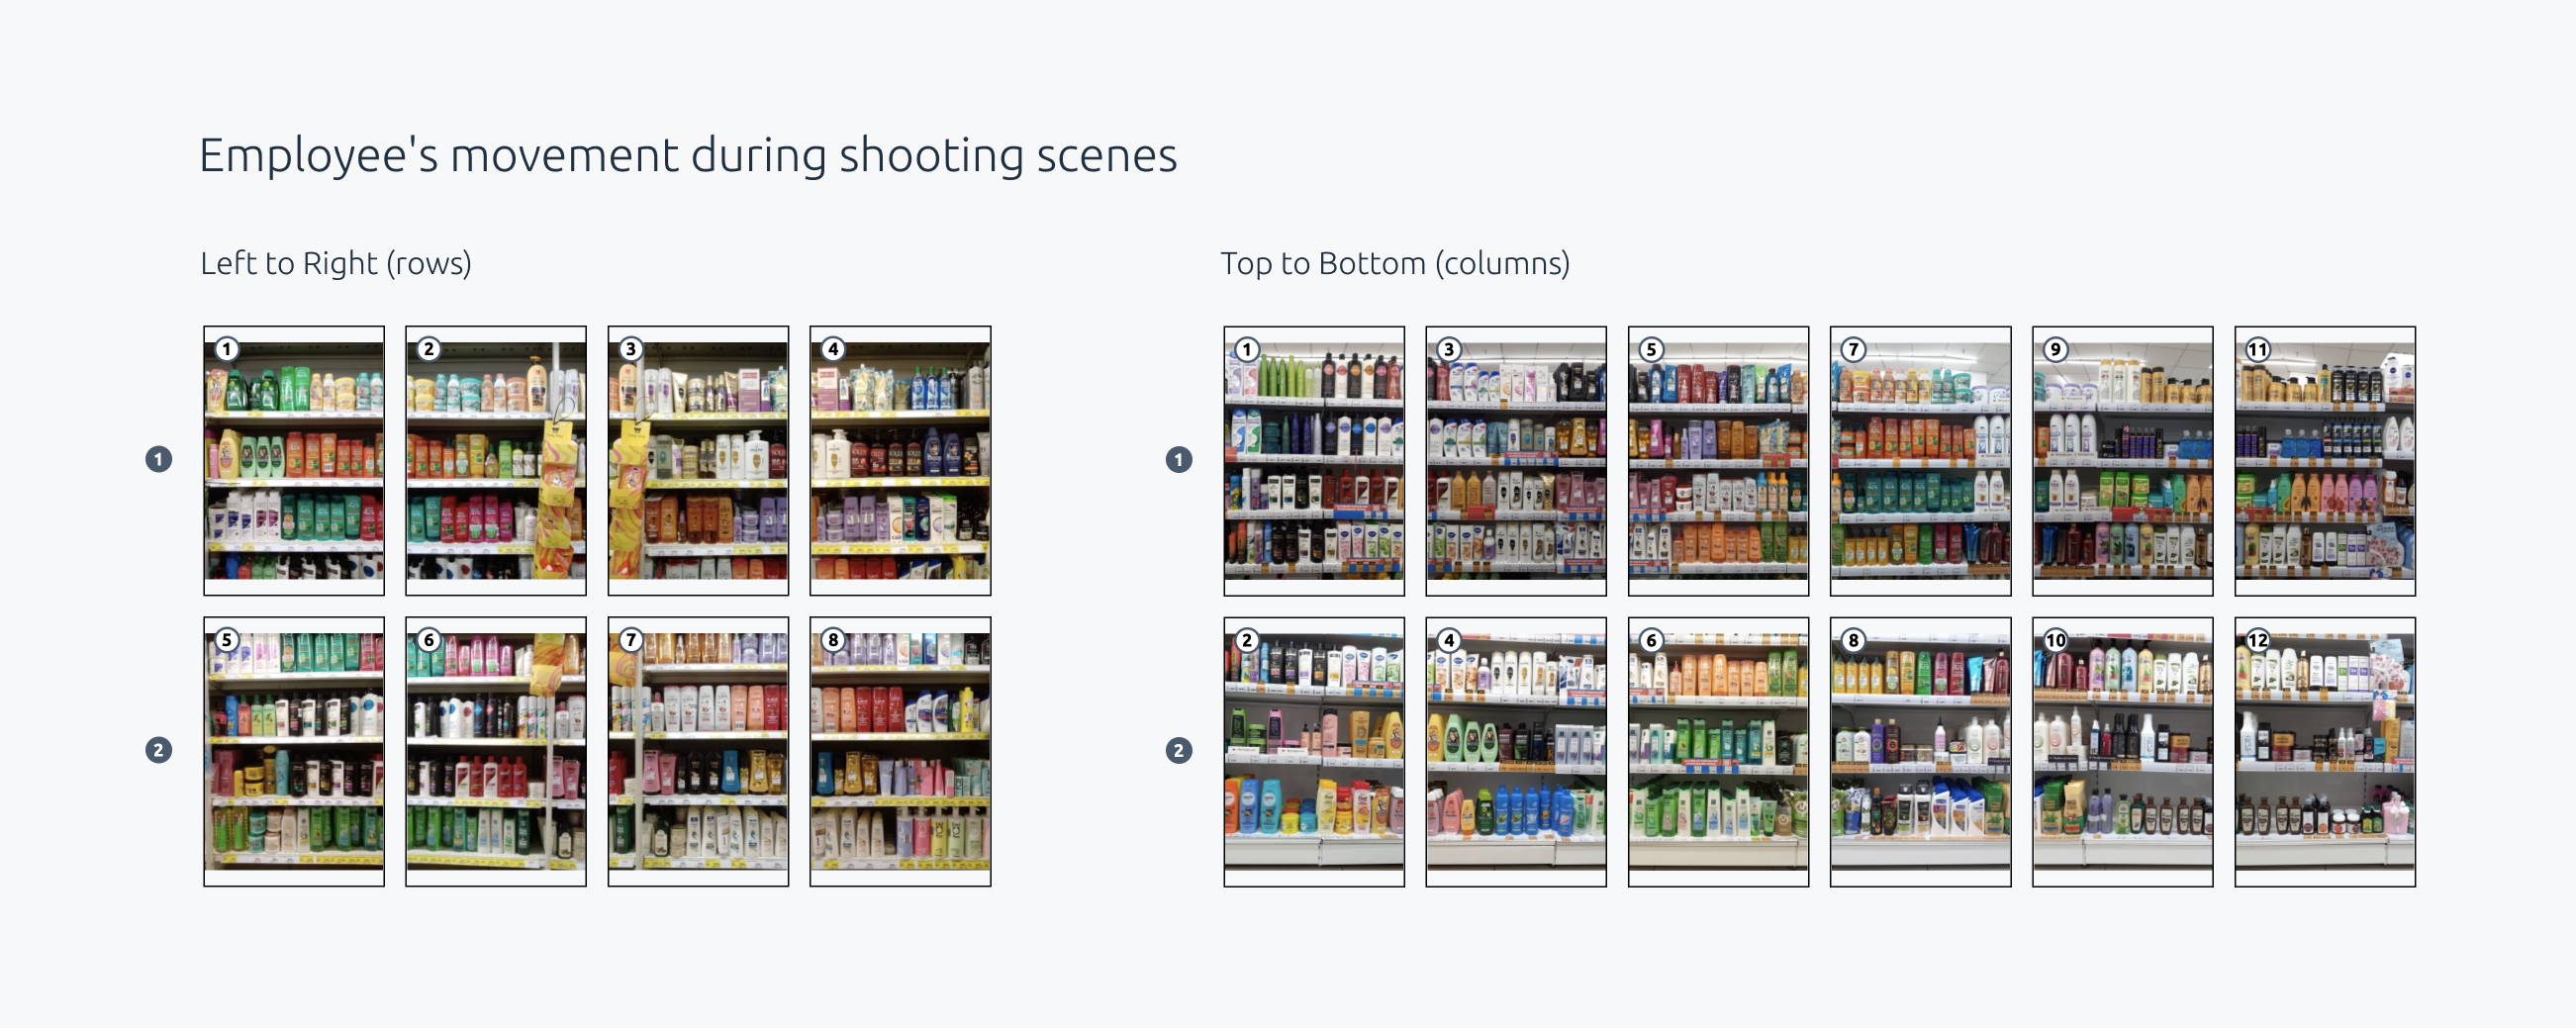
Left to Right (rows)
Start at the top left corner of the display, move right to the end of the display, move to the row below. Start the next row below the first photo of the first row, move right to the end of the display. The number of rows is unlimited
Top to Bottom (columns)
Start at the top left corner of the display, take a photo below the first photo, forming a column. Go back to the top, take a photo to the right of the first photo, then a photo below it, forming a column. Move in this way to the right until the end of the lay-out. The number of rows is limited to two, you can have as many columns as you like
Mini-map
Immediately after starting the camera, the shooting method Left to Right is used
The mini-map on the camera window ![]() shows the current progress of the scene and the shooting method. The photo that is being taken now is marked with a white flashing rectangle. The place to go is marked by a rectangle with a white border. Photos already taken are grayed out
shows the current progress of the scene and the shooting method. The photo that is being taken now is marked with a white flashing rectangle. The place to go is marked by a rectangle with a white border. Photos already taken are grayed out
Tap the mini-map to switch the shooting method. The white blinking rectangle and the rectangle with a white border swap places and you will see a notification. Tap the mini-map again to change the shooting method again
Tilt sensor
It is not recommended to take a photo with a large tilt in the camera with recognition. If the tilt is exceeded, you will see the tilt ![]() turn red, and if you try to take a photo, you will see a warning and no photo will be taken
turn red, and if you try to take a photo, you will see a warning and no photo will be taken
Press the button below the alert or the tilt sensor button to turn it off. You will see a notification when you turn the tilt on or off
When the tilt sensor is off, it turns yellow if the tilt is exceeded. You can take a picture in this case
Flash
Turn the flash ![]() on to brighten photos. The flash button will turn green if the flash is currently on
on to brighten photos. The flash button will turn green if the flash is currently on
Flashlight
Turn on the flashlight ![]() to get a constant light. The flashlight button will turn green if the flashlight is now on
to get a constant light. The flashlight button will turn green if the flashlight is now on
Switching the camera to the front or main
Press the camera switch button ![]() if you want to change the camera to the front camera. Press the button again to return the main camera. It is not recommended to take photos with both the front and main camera in the same scene, as the photos may not merge properly into one scene
if you want to change the camera to the front camera. Press the button again to return the main camera. It is not recommended to take photos with both the front and main camera in the same scene, as the photos may not merge properly into one scene
Grid
Click the grid button ![]() to display a markup on a third over the camera window to help you take smoother pictures. Click the button again to turn off the grid. The grid is retained when you open and close the camera
to display a markup on a third over the camera window to help you take smoother pictures. Click the button again to turn off the grid. The grid is retained when you open and close the camera
Crop
Tap the photo crop button ![]() to turn on the mode when you select the desired area to take a photo. Move the area or change its size by pulling the corners. When the area is customized, take a photo. It will be saved at the size you want. To redo the photo, delete it and redo it, or tap Resize in Photo View
to turn on the mode when you select the desired area to take a photo. Move the area or change its size by pulling the corners. When the area is customized, take a photo. It will be saved at the size you want. To redo the photo, delete it and redo it, or tap Resize in Photo View
Photo cropping is enabled upon request of the client company and is not displayed by default. If you are interested in this functionality, please contact your company's project team.
Exit the camera
Press the red back arrow ![]() to exit the camera. Photos will not be saved if you exit the camera. If you change your mind about closing the camera, tap Cancel in the pop-up window
to exit the camera. Photos will not be saved if you exit the camera. If you change your mind about closing the camera, tap Cancel in the pop-up window
Viewing photos taken
Click on the preview of the previous photo ![]() , to the left of the photo button, to open a preview of photos taken in that scene
, to the left of the photo button, to open a preview of photos taken in that scene
Choose from three viewing modes: List, Scene, and End-to-End
List view mode - view photos by flipping photos left and right. Click Delete to delete the last photo. Only the last photo can be deleted. To remake a photo that is not the last photo, tap Reshape
Click on the photo to view it in detail, then zoom in, zoom out and move if necessary
Scene view mode-view photos that have been pre-overlaid and combined into a preliminary scene. This mode helps you evaluate overlapping photos during shooting
End-to-End view mode - view photos that are attached to each other without indentation, but joined together in a preliminary scene. This mode can help you evaluate the overlap between photos if Scene mode doesn't work for you for some reason
Reshooting a photo
Click the Reshoot button in the photo view to replace the photo. When you reshoot, you will see the location of the photo in the scene on the mini-map. After you take a new photo, the reshoot mode will immediately turn off and you will move on to continue shooting the scene
To cancel the photo reshoot, press the red cross or the mini-map
Displaying and selecting the current direction of movement when photographing
When you change the shooting method, the arrow to the right of the shooting button ![]() changes to the direction you need to follow now. That is, when shooting in rows, the arrow will look to the right and change to down when you move to the next row. When shooting in columns, it will continually display moving to the next column, down and to the right
changes to the direction you need to follow now. That is, when shooting in rows, the arrow will look to the right and change to down when you move to the next row. When shooting in columns, it will continually display moving to the next column, down and to the right
Click on the arrow button to change direction. You will see a notification when you change direction. Press the arrow button again to change direction again
Finish shooting
Click on the green check mark ![]() to finalize the scene and attach all photos to the report
to finalize the scene and attach all photos to the report